Sub-Total: $0.00
My Exact Sourdough Baking Schedule (How I Make It Work In My Home Bakery)

 (1)")
One of the most common things I hear from people who want to start baking sourdough is this:
“I don’t have time.”
And I understand that completely.
Between feeding animals, managing orders, keeping up with life, and baking around 60 loaves a week in my home kitchen, I don’t have endless free time either.
What I do have is rhythm.
And that’s the difference.
Sourdough doesn’t require constant attention.
It requires understanding the process and working with it instead of against it.
This is the exact schedule I use week after week in my micro-bakery kitchen. It’s not theoretical. It’s what consistently works.

The Day Before Dough Day: Building a Strong, Active Starter
Around 11 AM, I give my starter its first feeding of the day.
(Feeding it twice within 24 hours is my little secret to keeping it extremely active and healthy.)
Before that first feeding, I calculate how much total starter I’ll need for all of the dough the next morning. For this example, let’s say I need 2,250 grams of starter.
First Feeding — 11 AM
To prepare for that larger build, I start small and intentional.
I mix:
- 83 grams starter
- 83 grams water
- 83 grams flour
This gives me approximately 250 grams of starter total.
I use a 1:1:1 feeding ratio here so the starter peaks within several hours and is ready for its final feeding around 8 PM.
The key here is that I do not discard after this feeding. The total amount after this build (250g) is intentional — it’s exactly one-quarter of the flour I’ll add at night.
Second Feeding — 8 PM (The Final Build)
Around 8 PM, I take that full 250 grams — without discarding — and feed it:
- 1,000 grams water
- 1,000 grams flour
That brings the total starter to approximately 2,250 grams, which is exactly what I need for mixing dough the next morning.
For this final build, I’m essentially using a 1:4:4 ratio (1 part starter, 4 parts flour, 4 parts water). This higher feeding gives the starter enough fuel to rise steadily overnight without over-peaking.
If your kitchen runs warm, you may need to increase that ratio slightly (1:5:5, for example) to prevent it from peaking too early.
If you looking for a good container to make large amount of starter, this one is my favorite. It holds 2,250 grams perfectly and I don’t have to worry about it overflowing.
Why This Two-Step Feeding Works
Feeding twice within 24 hours strengthens the yeast population and balances the bacteria. It creates a vigorous, active sourdough starter that has the fermentation power needed for multiple loaves.
When you’re baking 10, 20, or even 60+ loaves a week, you quickly learn:
Fermentation strength matters far more than fancy techniques.
📌 Starter Feeding Ratio Chart (1:4:4 Example)
| Total Starter Needed | Starter (1 part) | Flour (4 parts) | Water (4 parts) |
|---|---|---|---|
| 900 g | 100 g | 400 g | 400 g |
| 1,350 g | 150 g | 600 g | 600 g |
| 1,800 g | 200 g | 800 g | 800 g |
| 2,250 g | 250 g | 1,000 g | 1,000 g |
| 2,700 g | 300 g | 1,200 g | 1,200 g |
🥖 Starter Build Calculator Tip
Here’s the simple way I calculate my overnight build:
- Decide how much total starter you need.
- Divide that number by 9.
(Because 1:4:4 = 9 total parts.) - That number is your “starter” amount.
- Multiply that number by 4 for flour and 4 for water.
Example:
Need 2,250 grams total starter?
2,250 ÷ 9 = 250 grams starter (this will be the total finished amount after the 11am 1:1:1 feeding)
250 × 4 = 1,000 grams flour
250 × 4 = 1,000 grams water
Done.
No guessing. No waste. No discard. Just strong active starter 😊.
A Note on Storage
I keep my starter at room temperature since I bake multiple times per week.
If you bake less often, you can store your starter in the refrigerator and feed it the day before baking.
Feeding at night ensures it’s bubbly, active, slightly domed at peak, and ready to mix into dough by morning.
And that consistency?
That’s what builds predictable, beautiful bread.
Morning: Mixing the Dough
Around 8 AM — after coffee, the gym, raw milk pick-up, and morning chores — I start mixing dough.
Into each bin goes:
- Active starter
- Warm water
- Flour
- Salt
Mixing takes about 5–10 minutes per batch.
Because I’m often working with volume, I use large food-safe containers and try not to mix more than 20 loaves per bin. Even at that size, the dough is heavy and can be difficult to handle during stretch and folds.
If you are looking for great bins to use, here is a link to the items I use weekly in my home bakery.
As soon as I mix a batch, I write the mixing time on the outside of the container. When you’re managing multiple bins, this prevents confusion later in the day.
I intentionally space each batch about 1 hour apart. This gives me enough time to shape one bin before the next reaches peak fermentation. If batches are mixed too close together, you risk dough over-proofing before you can get to it.
If you’re just starting out, I’d recommend spacing them about 1 hour and 15 minutes apart until you get comfortable with your timing.
By late morning — usually around 12 or 12:30 — all my bins are mixed and have completed their folds.
Mid-Morning: Stretch & Folds
Between 8:30–10 AM, I perform 3–4 stretch and folds per batch, spaced about 30 minutes apart.
Each session takes less than a minute.
When baking at scale, efficiency matters. These quick folds build structure without overworking the dough.
Most days, I’m doing this while:
- Cleaning up the kitchen
- Starting laundry
- Preparing inclusions for loaves during shaping
- Or stepping outside to check on the animals
It becomes part of the rhythm — not a disruption.
Midday to Afternoon: Bulk Fermentation
After the final stretch and fold, the dough rests and bulk ferments.
In my kitchen:
Summer: about 5–6 hours
Winter: about 6–7 hours
Those time ranges come from baking through seasons and learning how temperature affects fermentation week after week.
This stage is mostly hands-off.
The key is learning to read the dough — not just the clock.
A Quick Reality Check
One of the biggest misconceptions about sourdough is that it requires hours of constant hands-on work.
That can be true if you’re running a micro-bakery. But if you’re baking one or two loaves at home, it doesn’t need to take over your day.
Sourdough requires short, intentional touch points — not nonstop attention.
Once you understand the rhythm, it fits naturally into real life.
Late Afternoon: Shape & Refrigerate
Once the dough has properly bulk fermented and doubled (usually 7 hours), I shape each loaf and place it into a banneton basket. I then let the baskets sit out at room temp for about 1-2 more hours (total time from mixing to fridge is usually around 8.5 hours but can change change quite a bit when its really cold or really warm). Then they are placed in the refrigerator for an overnight cold proof.
If you’d like a detailed breakdown of my shaping technique, I walk through it step-by-step in my beginner sourdough mistakes post:
👉 Beginner Sourdough Mistakes: Why Your Loaf Is Flat, Dense, or Gummy (And How to Fix It)
This is the step that makes sourdough sustainable long term.
Cold proofing builds flavor, strengthens structure, and — most importantly — creates flexibility in your schedule.
And flexibility is what keeps sourdough from becoming stressful.
Next Morning — Or When Life Allows — Bake
Ideally, I bake the next morning.
Because I have to. I’m running a business, and people have already paid for their loaves. 😅
But here’s something many beginners don’t realize:
You have a window.
From baking dozens of loaves each week, I’ve found that cold fermentation offers more flexibility than most people expect.
Here’s what that window typically looks like in my kitchen:
- 12–18 hours in the fridge → Mild flavor, strong oven spring
- 24 hours → Slightly more developed sourness, excellent structure
- 36 hours → Fuller flavor, slightly looser dough
- Up to 48 hours → Still usable, but quality may begin to decline
After about 48 hours, over-fermentation becomes more likely. You may notice:
- A sharp, overly sour smell
- Slack or overly sticky dough
- Reduced oven spring
At that point, it’s usually better to start fresh.
But in most real-life situations, you have at least a full 24-hour window — and often closer to 36.
Some of my favorite loaves have actually been baked later than planned.
Sourdough is more forgiving than people think.
Why This Schedule Works
Because it respects:
- Natural fermentation
- Seasonal temperature shifts
- Real-life interruptions
- And the fact that you’re not standing in your kitchen all day
After baking thousands of loaves, I’ve learned this:
Consistency doesn’t come from obsessing over the clock.
It comes from understanding the process.
When you understand fermentation, sourdough fits into your life — not the other way around.
My Current Microbakery Baking Schedule Breakdown
Right now, I have two main dough prep days each week: one small batch day and one large batch production day for pre-orders.
Sunday Night
I feed my starter so it’s active and ready to go for Monday’s dough prep.
Monday – Small Batch Dough Prep
Monday is my smaller baking prep day. Right now I typically prep about 10 loaves, although I’ll likely be increasing that to around 15 loaves soon once I add another oven to my setup.
Tuesday – Small Batch Bake + Main Dough Day
Tuesday is definitely my biggest work day in the bakery.
In the morning, I bake the loaves that were prepped on Monday. At the same time, I’m also mixing and prepping all of the dough for my large weekly pre-orders. Depending on the week, this is usually anywhere from 40–70 loaves.
Between stretch and folds, I drop off the fresh baked loaves at my pickup location in town.
Because of the amount of dough handling, stretch and folds, shaping, and organization involved, I keep Tuesdays completely open in my schedule so I can focus fully on baking and dough prep.
Wednesday – Main Baking Day
Wednesday is dedicated to baking all of the pre-order loaves that were prepared on Tuesday.
Again, this is a full-day process for me, so I purposely structure my week to stay home and focus only on baking.
Thursday Morning – Deliveries + Pickups
All orders are delivered or available for pickup first thing Thursday morning.
For me personally, this schedule works much better than trying to bake everything at 3:00 AM the same morning as pickup, which is what many bakers do.
I deliver bread to the gym very early on Thursday mornings, so I simply wouldn’t have enough time to bake fresh loaves before those deliveries.
Honestly, I also prefer sourdough bread the next day anyway.
Fresh baked sourdough can actually be very difficult to slice properly right out of the oven because the crumb is still setting. By the next morning, the texture is usually even better, easier to cut, and more stable overall.
So if baking the day before delivery works better for your family or schedule, don’t feel like you’re doing something “wrong.” There are many ways to successfully run a microbakery, and finding a rhythm that works for your real life is the most important part.
How I Store Bread Overnight Before Delivery
I’ve had quite a few questions about how I store my bread overnight when I’m baking the day before delivery, so I wanted to explain my process.
I’ve also been asked whether I’ve ever received complaints that the bread isn’t fresh because it was baked the day before. The answer is no — I’ve never had a complaint about freshness.
In fact, I personally prefer to let a loaf rest overnight before cutting into it. I find the crumb has more time to set, the loaf slices more cleanly, and it doesn’t compress as much while cutting. In my experience, it’s still every bit as fresh the next day, and the extra resting time allows the loaf to fully settle after baking.
As for storage, I place each loaf into the same kraft bread bag it will be delivered in, but I leave the tops of the bags open overnight. The loaves are then stood upright in large storage bins.
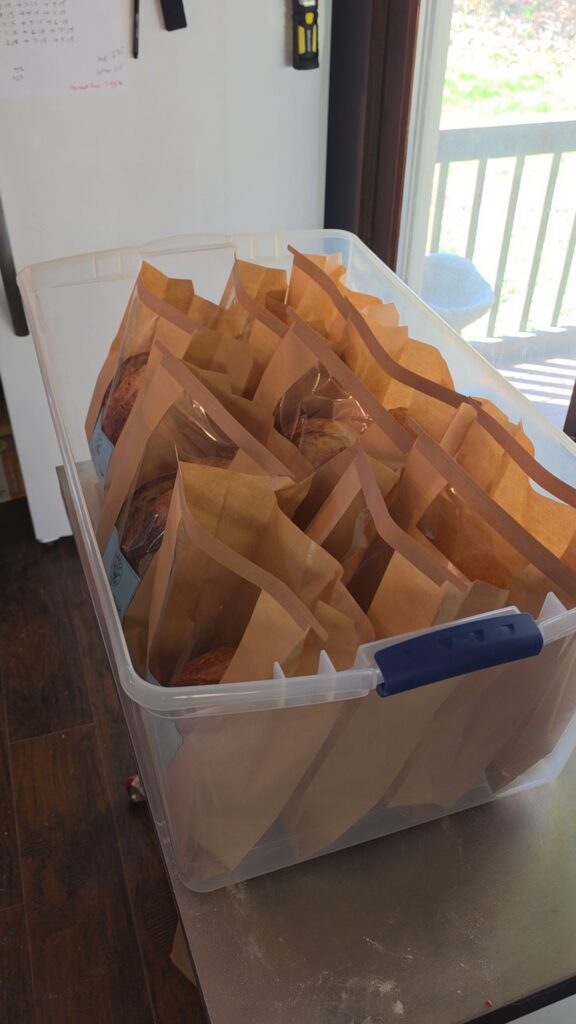
Leaving the bags open helps prevent excess moisture from becoming trapped inside. This keeps the crust from softening too much and allows the loaves to maintain the texture and crust that people expect from artisan sourdough bread.
The next morning, I simply fold and close the tops of the bags before loading the bins and taking them to their pickup locations.
This storage method has worked very well for me and helps ensure that customers receive bread that is fresh, properly rested, and ready to enjoy.
If You’re Just Getting Started
If this schedule feels manageable, begin with a strong foundation.
You can find my full beginner-friendly recipe here:
👉 Simple Farmhouse Sourdough Bread Recipe (Beginner-Friendly + Digestible)
And if you need an active starter to begin, I offer the same organic starter I use weekly in my own kitchen — along with simple guidance to help you avoid the most common beginner mistakes.
Final Encouragement
You don’t need perfection to bake good bread.
You need patience.
You need observation.
And you need a rhythm that works for your life.
The rest comes with practice — and a few failed loaves along the way.
Frequently Asked Questions About Sourdough Timing
Can I leave sourdough in the fridge for two days?
Yes — in most cases, 36–48 hours is workable. Flavor will become more sour and structure may weaken slightly, but many loaves still bake beautifully within that window.
Do I have to follow a strict sourdough schedule?
No. Once you understand fermentation, timing becomes flexible. The dough responds to temperature and strength — not rigid rules.
What if I miss a stretch and fold?
Your bread will likely still turn out fine. Structure may be slightly different, but sourdough is forgiving — especially if your starter is strong.
4 responses to “My Exact Sourdough Baking Schedule (How I Make It Work In My Home Bakery)”
-
Good day
How are you atoring your bread for the next day delivery? I am scared the bread will harden and people will think it is an old bread. Do you then bake a day before and pack before you deliver or they collect?
I tried overnight fermentation but my loaf when I tilted it out whent flat like a pancake-
Hello, I put all my bread in kraft bread bags the night before delivery but I don’t close the tops. So they are standing up in big tote bins with the tops of the bread bags open. The next morning I close all the bags and drop off at the pickup locations. They collect their bread from the pickup locations. I’ve never had any complaints about “old bread” or it not being fresh. I personally prefer to wait until the next day to slice into my own loaf. It’s so much easier to cut and the whole loaf doesn’t smoosh…lol. It’s still very fresh in my opinion. I’m going to add a picture of how I store the bread overnight to my post 😉. Hope this helps!
-
-
Hello!
I loved reading about your processes!
Iv just started selling my bread. But il curious what your set up looks like to be able to bake so many loaves? Do you have multiple fridges and ovens?
-
Hi! I’m glad you have found the info useful 😊. I need to do a walkthrough of my kitchen/dining room to show my set up. I’ll add that to my to do list 😉. But for now to answer your question…I have one fully dedicated bread refrigerator and two other refrigerators in the kitchen that can be used as overflow when needed. I use my kitchen oven for scones, cookies, and sandwich bread. Everything else is baked in my Pico Plus bread oven. Right now I can bake 5 regular size loaves at a time in there but I am getting a second one on Monday that will double my capacity and I’m so excited. Its a great oven that can grow with you business because it can be stacked 3 high. Here’s the link if you are interested in checking it out. Pico Plus Let me know if you have any more questions. Best of luck with your new business!
-
Tags:

Leave a Comment