Sub-Total: $0.00
Simple Farmhouse Sourdough Bread Recipe (Beginner-Friendly + Digestible)

 (1)")
👉 Includes an overnight option for busy schedules
There was a time when I stood in the bread aisle at the grocery store reading ingredient labels and thinking… this can’t be right.
Why does bread need this many additives? Why are there ingredients I can’t pronounce?
That was the beginning of my journey toward making a simple sourdough bread recipe I could feel good about serving.
I didn’t start baking because it was trendy. I started because I wanted simple bread. Flour. Water. Salt. Something I could feel good about feeding my family.
It took trial, error, and hundreds of loaves to refine.
There were flat loaves. Dense loaves. Loaves that looked beautiful on the outside and gummy in the middle. (I have the photos to prove it 😅)
But eventually… I pulled one perfect golden loaf out of the oven.
And after that, there was no stopping me.
I now bake around 60 loaves a week in my home kitchen, so this isn’t just a weekend experiment — this is the method I rely on consistently.
Sourdough baking is part of my rhythm — right alongside feeding chickens, tending the homestead, and yes… occasionally breaking up rooster fights.
One afternoon, while my dough was in the middle of bulk fermentation, I heard absolute chaos outside. Two roosters had decided it was time to challenge each other. So there I was — flour on my hands, apron on, trying to separate feisty farm birds before running back inside to finish stretch-and-folds.
That’s real-life sourdough on a homestead.
And somehow… the bread still turned out beautifully.
Why I Love Making My Own Bread
For me, sourdough isn’t just about taste (although the flavor is incredible).
It’s about:
- Knowing every ingredient
- Long fermentation that makes it easier to digest
- Slowing down
- Returning to traditional methods
There’s something deeply grounding about mixing flour and water and watching it transform.
And once you get the rhythm down, it truly becomes simple.
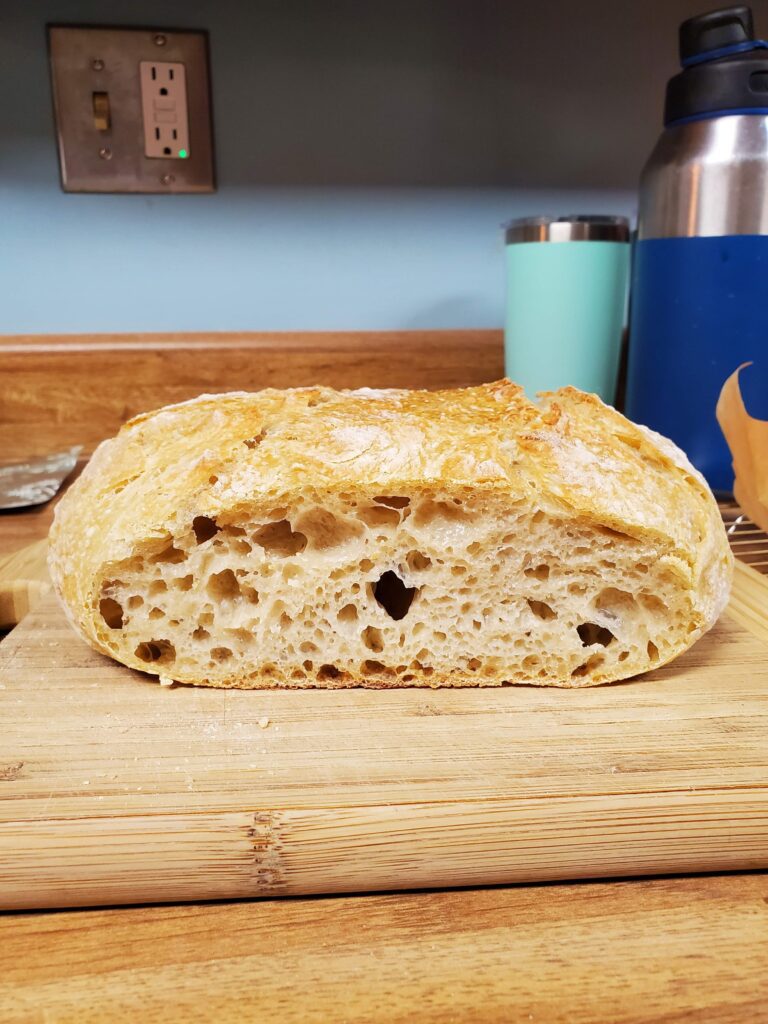
My Simple Sourdough Bread Recipe
This is the exact recipe I use over and over again. It makes one beautiful ~800g loaf with a crusty exterior and soft, airy interior. If you’re new to baking, this simple sourdough bread recipe is a great place to start.
Ingredients
- ¼ cup (50g) active sourdough starter (fed and bubbly)
- 1⅓ cup + 2 tablespoons (350g) warm water (about 80°F)
- 4 cups (500g) bread flour
- 1½ teaspoons (9g) fine sea salt
Mixing the Dough
Add 50g starter to a mixing bowl (I love using a clear container so I can see the rise later). Add water and mix. Then add flour and salt.
Mix until shaggy. It won’t look perfect — that’s okay.
Cover with a damp towel and let rest 30 minutes.
After resting, use your hands to fully incorporate everything. Then begin your first stretch and fold: pull one side up and fold toward the center. Work around the bowl.
Cover and rest again.
Stretch & Folds + Bulk Fermentation
Perform 3 more stretch-and-fold sessions about 30 minutes apart.
After the last one, cover and allow the dough to bulk ferment until doubled.
In my 70° house:
- Summer: about 5½ hours
- Winter: closer to 7 hours
(Pro tip: I write the mixing time directly on my bowl with a dry-erase marker so I don’t forget.)
Bulk fermentation timing starts when ingredients are mixed — not after stretch-and-folds.
Shaping
Once doubled, gently shape into a ball and rest 15 minutes. I normally shape my loaves after 7 hrs of fermentation.
I start by gently stretching the dough into a triangle, with the point facing away from me at the top.
Then:
- I fold the two bottom corners into the center.
- Next, I pull the top point down over those folds, creating an upside-down triangle.
- I fold the two sides inward again toward the center.
- Starting from the bottom, I roll the dough up onto itself, gently pressing to release any large air pockets — but not so tightly that I compress the structure.
- Finally, I pinch the seam closed, flip it over, and place it seam-side up into a floured banneton.
You can watch a demonstration of this technique below.
Place seam-side up in a floured banneton (or bowl lined with a tea towel). After placing in the banneton, I like to cover and rest the dough an additional 1-1.5 hours in the basket before moving to the fridge for overnight cold proof. So total time from mixing until the dough is put in the fridge is usually 8-8.5 hours.
(I use disposable shower caps for covers — simple and effective.)
Baking
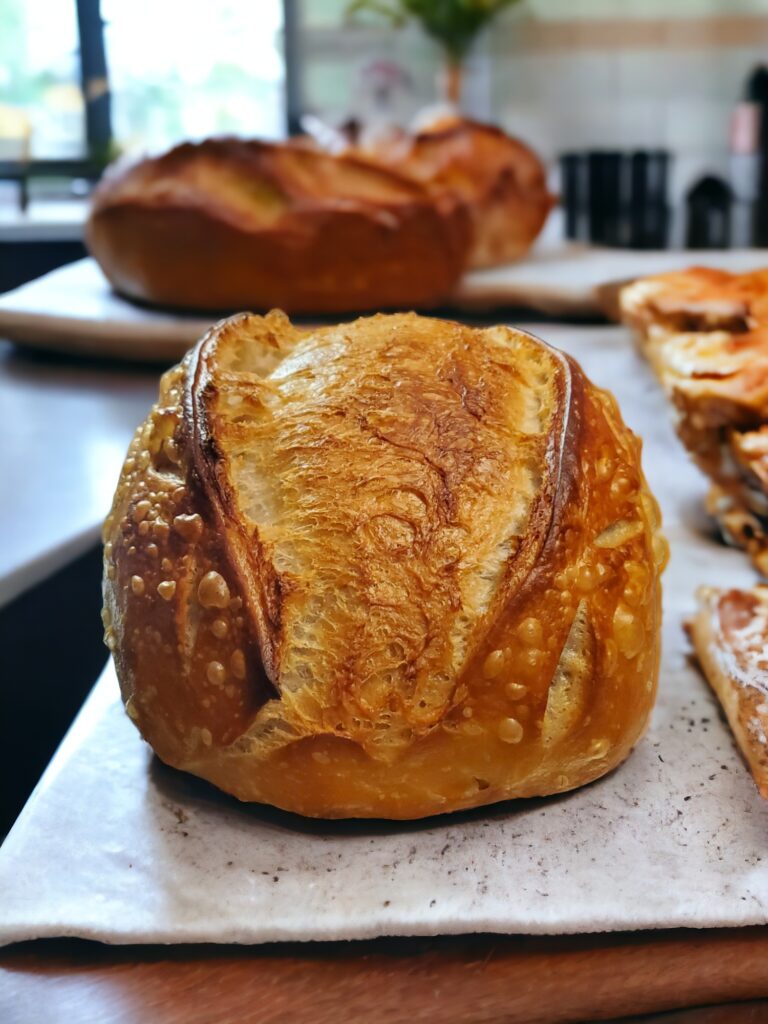
The next day, preheat oven to 450°F with a cast iron Dutch oven inside for 30–45 minutes.
Flip dough onto parchment paper, score with a razor, and transfer into Dutch oven.
Optional: Add 1–2 ice cubes under parchment for steam.
Bake:
- 25 minutes covered
- 15–20 minutes uncovered
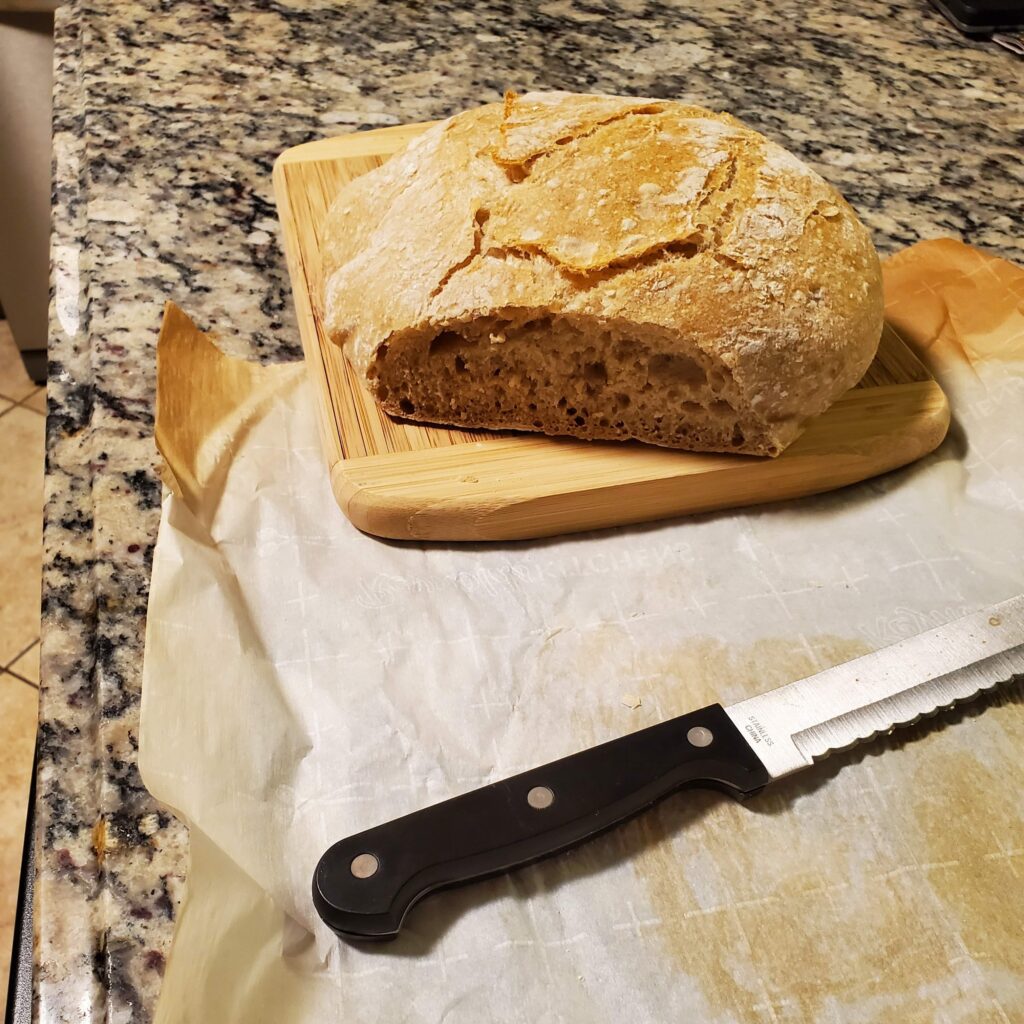
Remove immediately and cool at least 2 hours before slicing.
Tip: Place a sheet pan on the rack below your Dutch oven to prevent over-browning on the bottom.
🌙 Overnight Option (Perfect for Busy Schedules)
Short on time during the day? You can make this dough at night instead. If you plan to mix dough at night, make sure you don’t forget to feed your starter in the morning so its ready to go 😉.
Example Schedule:
- 9:00 PM – Mix dough
- 9:20 PM – Stretch & fold
- 9:50 PM – Stretch & fold
- (Optional) 10:10 PM – One more stretch & fold
👉 Two sets is perfectly fine if you’re tired
👉 Three quick sets (20 minutes apart) is ideal if you have time
💤 Overnight Ferment
- Cover the dough and place it somewhere cool in your home
- Let it ferment overnight for 8–9 hours
Need a longer window (up to 10 hours)?
→ Use cold water when mixing
Using room temp water?
→ Stick closer to 9 hours to avoid over-fermenting
🌅 In the Morning
- Shape the dough
- Place in a banneton
- Transfer to the fridge
Done in just a few minutes.
❄️ Bake on Your Schedule
Your dough can now rest in the fridge until you’re ready to bake.
- 12–18 hours → Mild flavor, strong oven spring
- 24 hours → Slightly more sour, excellent structure
- 36 hours → Fuller flavor, slightly looser dough
- Up to 48 hours → Still usable, but quality may decline
Tools I Personally Use
Instead of listing random equipment, here’s what I actually reach for:
- My go-to baking tools can be found in my Amazon storefront:
👉 Amazon Store - I also offer my own organic sourdough starter (with tips + this printed recipe included):
👉 Organic Sourdough Starter
These are the tools I rely on week after week while baking dozens of loaves — nothing fancy, just what works.
From Failed Loaves to a Thriving Micro-Bakery
If you’ve tried sourdough before and felt discouraged… I’ve been there.
My early attempts were not pretty.
But sourdough teaches patience. It teaches observation. It teaches you to adjust to temperature, season, and timing — just like farm life does.
And sometimes… it teaches you to pause mid-stretch-and-fold to referee roosters.
If I can make beautiful bread in the middle of farm chaos, you absolutely can too.
Want to Try It?
If you make this recipe, I’d love to hear how it turns out.
And if you’re just getting started, my organic starter (linked above) comes with everything you need to begin.
There’s something special about baking bread from scratch.
It feels like reclaiming something simple.
Continue Your Sourdough Journey
👉Beginner Sourdough Mistakes: Why Your Loaf Is Flat, Dense, or Gummy (And How to Fix It)
Common reasons sourdough loaves turn out flat, dense, or gummy — and how to fix them.
👉My Exact Sourdough Baking Schedule (How I Make It Work In My Home Bakery)
See how I manage fermentation, shaping, and baking when making dozens of loaves each week.
If you try this recipe, I’d love for you to leave a rating below ⭐⭐⭐⭐⭐— it helps others and supports my small bakery.

Simple Farmhouse Sourdough Bread
A beginner-friendly traditional sourdough loaf made with just flour, water, salt, and starter.
Servings: 1 loaf
Equipment
- 1 Clear Container my favorite for mixing and bulk fermentation
Ingredients
- 50 grams active sourdough starter
- 350 grams warm water
- 500 grams bread flour
- 9 grams sea salt
Instructions
- Mix the Starter: In a large mixing bowl, combine the active sourdough starter and warm water. Stir until mostly dissolved.
- Mix the Dough: Add the flour and salt to the starter, and mix until no dry flour remains and a shaggy dough forms.
- Rest: Cover the bowl and let the dough rest for 30 minutes. This allows the flour to fully hydrate and begins gluten development.
- Stretch & Folds: Over the next 90 minutes, perform 3–4 sets of stretch and folds about 30 minutes apart. To do this, gently lift one side of the dough, stretch it upward, and fold it over itself. Rotate the bowl and repeat 3–4 times per session. The dough will become smoother and stronger with each set.
- Bulk Fermentation: After the final stretch and fold, cover the dough and allow it to rise at room temperature until roughly doubled in size. This typically takes 6–8 hours depending on your kitchen temperature. The dough should look slightly domed with visible bubbles along the edges.
- Shape & Cold Proof: Turn the dough out onto a lightly floured surface. Gently shape it into a round by folding the edges inward and creating surface tension. Place seam-side up in a floured banneton or towel-lined bowl. Cover and refrigerate overnight (12–24 hours).
- Bake: Preheat your oven to 450°F with a Dutch oven inside for at least 30 minutes. Turn the dough onto parchment paper, score the top with a sharp blade, and carefully place it into the hot Dutch oven. Bake covered for 25 minutes, then uncovered for 15–20 minutes until deeply golden brown.
- Cool: Transfer the loaf to a wire rack and allow it to cool completely (at least 1 hour) before slicing. Cutting too soon can result in a gummy interior.
Notes
- If your kitchen is warm, fermentation may move faster.
- If cold, allow additional time.
- Dough should feel airy and slightly puffy before shaping.
- For best results, use an active, bubbly starter at peak rise.
🌙 Overnight Option (Perfect for Busy Schedules)
Short on time during the day? You can make this dough at night instead. If you plan to mix dough at night, make sure you don’t forget to feed your starter in the morning so its ready to go 😉. Example Schedule:- 9:00 PM – Mix dough
- 9:20 PM – Stretch & fold
- 9:50 PM – Stretch & fold
- (Optional) 10:10 PM – One more stretch & fold
👉 Three quick sets (20 minutes apart) is ideal if you have time
💤 Overnight Ferment
- Cover the dough and place it somewhere cool in your home
- Let it ferment overnight for 8–9 hours
→ Use cold water when mixing Using room temp water?
→ Stick closer to 9 hours to avoid over-fermenting
🌅 In the Morning
- Shape the dough
- Place in a banneton
- Transfer to the fridge
20 responses to “Simple Farmhouse Sourdough Bread Recipe (Beginner-Friendly + Digestible)”
-

This recipe is perfect and very easy to follow. Been baking sourdough for a few years now – 70% hydration is perfect for me. If you are new to sourdough baking, this is a great place to start. I’ve gifted loaves to a few people from this recipe and it’s been a hit every time.You get a very nice crumb from this and have dough that is easy to handle.
-
Thanks for trying the recipe! I’m so glad you enjoyed it 😊.
-
-
Thanx for the simple and clear recipe! I want to use it but I wander if any changes are necessary in case my flour is a mix of Wholewheat and All purpose (40%-60%). Please advise
-
Hi John, I have not made this using whole wheat flour but as a general rule of thumb, whole wheat flour usually requires 5% to 15% more water than white flour. So if your whole wheat is 40% (200g), I would increase the water for that flour respectively. So 140g water for that flour (40% of the total water) and then add anywhere from 5-15% on to that, so 7-21g of extra water. I guess I would start somewhere in the middle and adjust form there. Hope that helps! Let me know how it turns out 🙂
-
Only 50 g of starter, I’ve been using 120 g- am I missing something. I’m going to do this recipe and see but what can you tell me about such a lower starter amount for me?
-
Hi Debbie, I wrote a little more about it in my how to get a better rise blog post. But here is a copy of the section from that post:
3. My Dough Formula (Why I Use Less Starter)
Another thing that plays a big role in how my bread rises is the amount of starter I use in my dough and the quality of flour I use.Most traditional sourdough recipes use around:
👉 100g of starter
But in my kitchen, I use:
👉 50g of starter per loaf
Why I Use Less Starter
Using less starter slows fermentation slightly and gives the dough more time to develop strength.This helps:
✔ improve structure
✔ build stronger gluten
✔ create a better overall riseIt also gives you more control over fermentation, especially when you’re baking consistently.
What This Means for Your Dough
When you use less starter:fermentation takes a little longer
the dough develops more gradually
the final loaf has better structure and lift
This is a small adjustment, but it makes a noticeable difference in the final result.Flour Matters Too
I always recommend using a strong bread flour.Bread flour has a higher protein content than all-purpose flour and makes a big difference in structure and rise. My personal favorite is King Arthur Baker’s Classic Organic.
I don’t believe there is one correct amount of starter, it all comes down to personal choice and time. 50g is going to take quite a bit longer to ferment but I feel like it develops stronger dough for me.
-
-
-
Is it the same ingredients if I were to use a rye starter
-
Hi! 1/3 of the flour in my starter is always rye, so I don’t think you will have to change anything. If yours is 100% rye it may ferment a little faster and absorb slightly more water, but since the starter amount is only 50g I think you will be fine with the recipe as is. Let me know how it turns out!
-
-
Hello! Thank you so much for taking the time to blog so it will help others. I’ve just begun this journey a couple of months ago. I have a couple of questions. Is it recommended to use a thermometer to check if the bread has reached an internal temperature. Also you may have heard using the two loaf pan method. Second one is placed on top of the pan filled with dough. Do these need to be preheated also? Thank you for your time!
-
Hi! You’re welcome 😊. I enjoy sharing what I’ve learned. I do recommend using a thermometer to check temp on your loaves, especially if you are not sure. I usually check a loaf or two on my bake days just to make sure my oven is set correctly (my bread oven has a dial so it can be off a few degrees sometimes). Anyways, once you feel like you have the right time and temp, I wouldn’t say it’s necessary to check every loaf. I like mine to be at 210 degrees Fahrenheit. I am familiar with the two pan method. From what I’ve seen it works pretty well. I would not preheat those pans. They’re not cast iron like a Dutch oven so they will heat up real quick in the oven. Good luck with your baking!
-
-
You used the term “Autolyze” incorrectly, you should have used “Fermentolyse”!
The terms “autolyse” and “fermentolyse” are sometimes used interchangeably, but they have different meanings. Autolyse is a combination of flour and water only (no salt or starter/leaven). Fermentolyse is a combination of flour, water and starter/leaven.
-
Good catch! Thanks, that’s what I get for using AI to proofread and edit my recipes 😅. I didn’t have that in my original recipe, it just said rest. I switched it back to just rest to not confuse anyone. Thanks!
-
-
When mixing the initial dough, until no flour remains, how long do you mix? I thought mixing until a window pane forms was the desired outcome strength. (I have mixed by hand, and with a mixer). I am still struggling with my loaf. I will try the smaller amount of starter next time, to see how that affects things. 🤞
-
Hi. The window pane test is a technique performed after bulk fermentation to test the strength and gluten development of your dough. It’s not for the the initial mix. For the first mix, you just want everything to be combined and no big dry spots of flour. It usually just takes a few minutes to get to that point.
-
-
What do you think about the popular ”upfront mixing” to get amore open crumb? I’ve tried to mix for longer time (5-10 min) in the beginning but it doesn’t give better result…what is your opinion?
-
Hi Yvonne, I wasn’t actually familiar with this method and had to look it up…lol. Honestly, I think it’s just a trendy thing. I don’t really see the benefit when working with regular dough. If I was doing a brioche type dough I think its important to mix more up front but as long as you get most of the dry spots out, its good to go in my opinion. When I’m doing a large bin of regular dough, it usually takes me 3-4 minutes to get everything mixed.
-
-
Hi there, thanks for sharing your recipe and experience! I just recently started my own bread journey, and was experimenting with all different techniques. So far I’m getting better in regular one day bake method- baking right after bulk fermentation. My overnight cold proofing method gave me dense and chewy crumb but slightly better flavor. My dilemma with cold proofing though is this – should I bring my dough back to room temperature before baking ( for how long hours?), or is it good to go straight from the fridge into the oven? I was following King Arthur’ recipe. Thanks for your response!
-
Hi Barno,
Thanks for checking out my blog, happy to help! That’s interesting that it came out dense and chewy after cold proofing. Did you do the same bulk fermentation as always and then just move it to the fridge rather than baking? I’ve seen issues where people think the cold proof replaces bulk fermentation but it doesn’t, not saying you did that but just wanted to check. For this recipe, I typically bulk ferment for about 8 hours depending on my house temperature and then cold proof for about 16 hours. I bake straight from the fridge and don’t let it come to room temp. That’s what I would recommend doing. Hopefully it goes well for you next time!
-
-
Can I add bit of cheese and jalapeño in this loaf?
-
Absolutely! This is the same recipe that I use for all my inclusion loaves. I usually add inclusions during shaping by stretching out the dough and rolling in, but you could also add during the last couple stretch and folds. Delicious choice by the way 😉. Happy baking!
-
Tags:
Leave a Comment