Sub-Total: $0.00
Beginner Sourdough Mistakes: Why Your Loaf Is Flat, Dense, or Gummy (And How to Fix It)

 (1)")
There was a time when I genuinely thought I just wasn’t “good at sourdough.”
I had flat loaves. Dense loaves. Loaves that looked beautiful on the outside but were gummy in the middle. I followed recipes carefully. I measured everything. I waited the recommended number of hours.
And still… something was off.
Now that I bake around 60 loaves a week in my home kitchen, I can see clearly what was actually going wrong.
Most beginner sourdough mistakes have nothing to do with talent — and everything to do with fermentation strength and timing.
If your loaves aren’t turning out the way you hoped, here are the most common mistakes I see (and yes, I made every one of them).
Mistake #1: Using a Weak Starter (One of the Most Common Beginner Sourdough Mistakes)
In the beginning, I didn’t understand how much starter strength really mattered.
If your starter isn’t active and strong, your dough doesn’t stand a chance. You can shape beautifully, score perfectly, and bake in the best Dutch oven — but without fermentation power, the loaf will be flat or dense.
A strong starter should:
- Double (or more) after feeding
- Look slightly domed at peak
- Be bubbly throughout
- Smell pleasantly tangy, not sharp or overly sour
It’s also important to understand that a very young starter can look ready but still lack strength.
You’ll often see people advertising 100+ year-old starters — and while the age itself isn’t magical, there is truth behind the idea. A mature starter is a diverse, well-established microbiome. When starting from scratch, it can take quite a while to build up the wild yeast population needed for consistently beautiful bread.
If you’ve never had a starter in your kitchen before, I often recommend beginning with a dehydrated starter. The necessary yeast strains are already established — you simply need to wake them up.
Starting from scratch can absolutely be done, but it can also be frustrating. A new starter depends on the flour you use and the natural yeasts in your environment. If the right wild yeast strains aren’t present in strong numbers, it may take much longer to develop strength.
If you’d like to skip the trial-and-error phase, you can purchase my tried-and-true dehydrated starter here:
You can always experiment with creating your own from scratch after you’ve baked a few successful loaves and feel more confident. 😉
When I bake, I feed my starter at night using a 1:4:4 ratio so it’s strong and ready by morning. That feeding gives it enough fuel to rise steadily without collapsing too soon.
Fix: Don’t bake with a sluggish starter. Feed it properly, wait for peak activity, and build from there. Fermentation strength matters far more than fancy techniques.
Mistake #2: Under-Fermenting the Dough
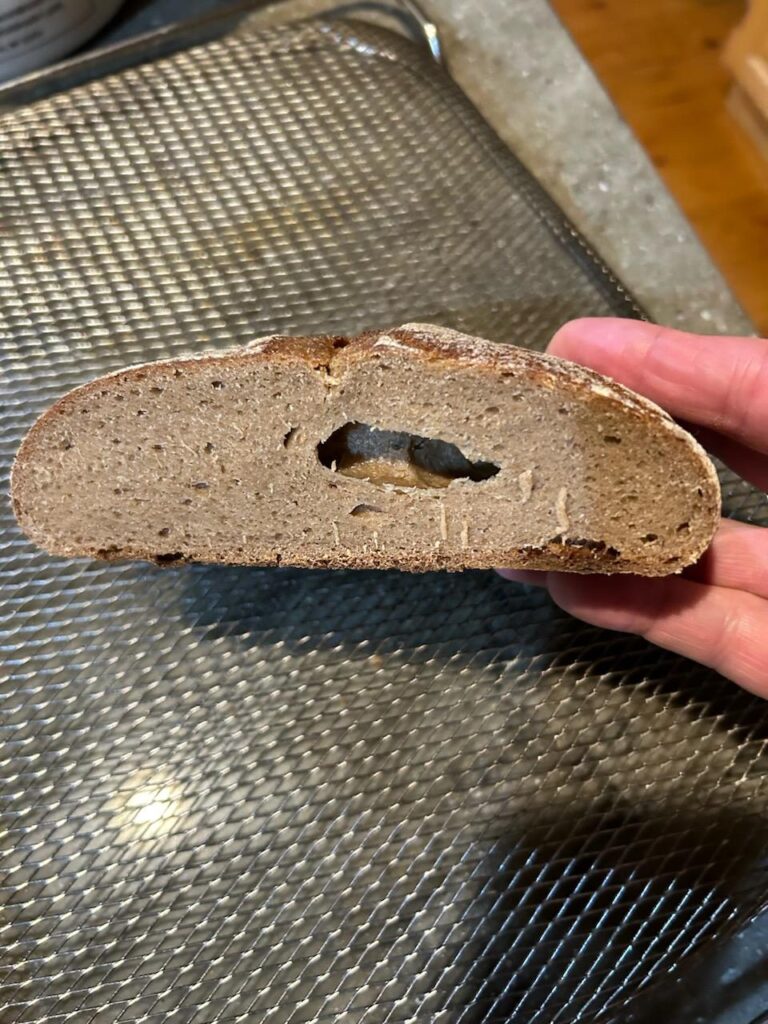
This mistake caused many of my flat loaves and tight, dense crumbs.
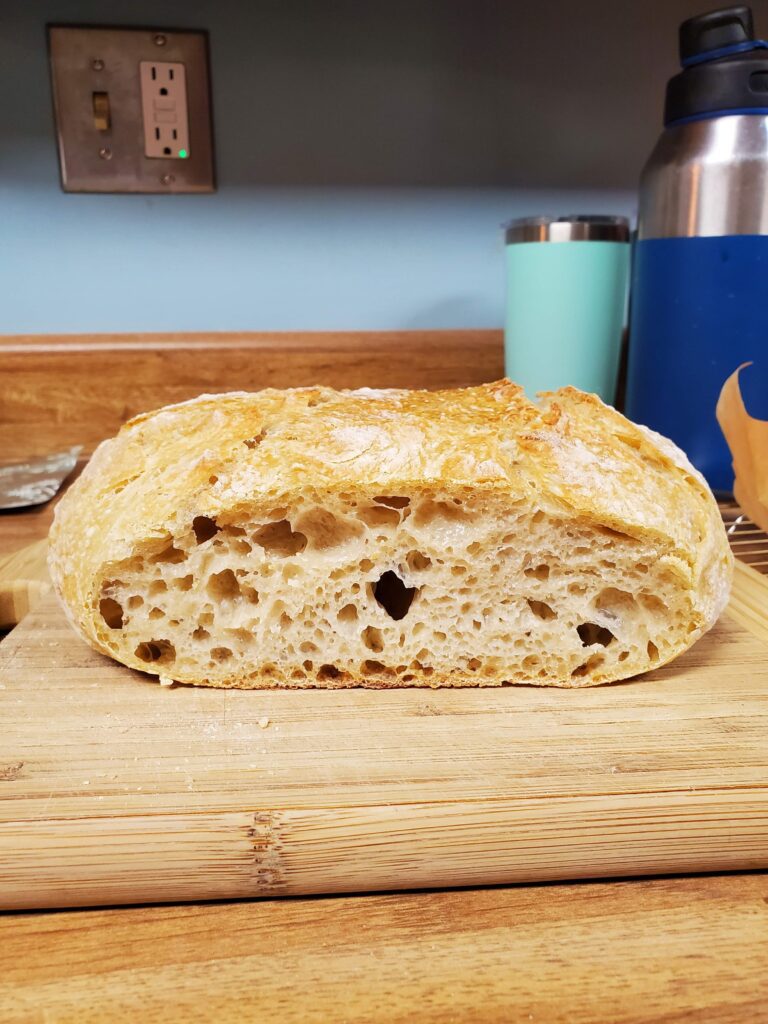
Under-fermented dough hasn’t developed enough gas or gluten structure. It often feels tight and heavy, without that airy, slightly puffy look you want before shaping.
One common sign that the dough isn’t ready is excessive stickiness. While sourdough will always be slightly tacky, it shouldn’t cling stubbornly to your fingers. If you gently poke the dough and pull your finger away, it shouldn’t leave behind a thick glob stuck to you.
The poke test is a helpful guide. Over time, you’ll begin to recognize the feel of properly fermented dough — soft, elastic, and full of life.
Early on, I watched the clock instead of watching the dough. If a recipe said “6 hours,” I stopped at 6 hours — even if my kitchen was cool and the dough clearly needed more time.
Fermentation time can vary drastically based on temperature. In my own kitchen, a house set at 68°F versus 70°F can mean an hour or more difference in bulk fermentation. That small change matters.
Now I look for signs instead:
- Noticeable rise (not necessarily doubled, but visibly expanded)
- Bubbles forming along the sides of the bowl
- A soft, airy feel when handled
- A gentle jiggle when the bowl is shaken
Fix: Watch your dough, not the clock. Fermentation depends on temperature, starter strength, and flour choice. Time is simply a guideline.
Mistake #3: Over-Fermenting
On the other side of the spectrum… over-fermentation.
This happens most often in warm kitchens or during the summer months. You get used to your typical rise time and schedule — and then suddenly it’s 80°F in your house and the dough is practically climbing out of the bowl.
It can also happen when the dough looks perfect and you think, “I’ll just give it a little more time.” Or life intervenes… like a rooster fight in the backyard, and you don’t get back to the dough when you meant to.
But sourdough doesn’t wait politely.
Over-fermented dough can:
- Collapse when turned out
- Feel overly sticky and weak
- Spread excessively during baking
- Taste overly sour
For beginners, over-proofed and under-proofed dough can look surprisingly similar. Both can feel sticky. The key difference is structure.
Under-fermented dough feels tight and dense.
Over-fermented dough feels loose and slack — almost like a blob that spreads across the counter instead of holding shape.
I’ve learned that once the dough reaches its ideal rise and texture, it’s better to shape and move forward rather than pushing it further “just in case.”
Fix: Learn the feel of properly fermented dough. It should be airy but still strong, holding its shape when turned out.
And if you ever end up with a loaf that feels too weak to hold a boule shape, don’t panic. You can proof it in a loaf pan instead. In my experience, traditional sourdough bakes beautifully in loaf pans — and sometimes that small adjustment saves the entire bake.
Mistake #4: Not Building Surface Tension When Shaping
For a long time, I thought shaping was just about making the dough round.
It’s not.
Shaping is about building surface tension — that outer “skin” that helps the loaf rise upward instead of spreading outward. It’s also about knowing how much to stretch the dough without overdoing it and weakening the gluten structure. You want tension, but not so much that the dough begins to tear.
When shaping a boule, here’s the method I typically use:
I start by gently stretching the dough into a triangle, with the point facing away from me at the top.
Then:
- I fold the two bottom corners into the center.
- Next, I pull the top point down over those folds, creating an upside-down triangle.
- I fold the two sides inward again toward the center.
- Starting from the bottom, I roll the dough up onto itself, gently pressing to release any large air pockets — but not so tightly that I compress the structure.
- Finally, I pinch the seam closed, flip it over, and place it seam-side up into a floured banneton.
You can watch a demonstration of this technique below.
Without proper shaping, even well-fermented dough can bake up flatter than expected.
That said, I don’t believe there is only one “right” way to shape. There are many effective techniques, and I’ve adjusted my own shaping routine multiple times over the years. The key is understanding what shaping is meant to accomplish — building tension while preserving structure.
It’s worth experimenting and finding the method that works best for you and your dough.
Fix: Take your time shaping. Gentle but deliberate tension makes a noticeable difference in final height and crumb.
Mistake #5: Cutting the Loaf Too Soon
This one is hard.
You pull a beautiful golden loaf from the oven. It smells incredible. The crust is crackling. Fragrant steam fills the kitchen.
And you want to cut it immediately.
I’ve done it — many times — because I just couldn’t wait any longer.
But slicing too soon traps steam inside and can create a gummy interior, even if the bread was baked perfectly. It’s also surprisingly difficult to cut into a fresh loaf. The crust is firm while the center is still soft and delicate. One firm press with the knife and you end up with a squished loaf and a jagged slice.
After years of learning this lesson the hard way, I plan ahead and let my loaves cool completely before slicing.
It’s not just about patience — it’s about structure. Your loaf is still finishing its internal setting as it sits on the counter. The crumb needs time to stabilize.
It’s similar to resting meat after cooking. Yes, both meat and sourdough are technically edible straight from the oven — but the final texture and structure improve when they’re allowed to rest properly.
Fix: Let the loaf cool fully before slicing. The texture improves dramatically.
I like to let my loaves sit at least 5–6 hours. Honestly, I think the crumb sets even better the next day. You don’t have to wait a full 24 hours — but give it a few hours so you don’t undo all the work you just put into that beautiful loaf.
What Actually Matters in Sourdough
After baking thousands of loaves, I can tell you this:
Sourdough isn’t as complicated as most people think — but it is alive. And like anything alive, it responds to how you care for it.
What matters most isn’t perfection. It’s understanding:
- Starter strength
- Fermentation timing
- Dough feel
- Gentle, intentional shaping
Once those pieces start clicking and you settle into a rhythm, everything becomes more predictable and far less intimidating.
If you’re just getting started — or still feeling unsure about the process — my simple farmhouse sourdough recipe walks through it step-by-step in a way that’s realistic for a home kitchen.sourdough recipe walks step-by-step through the process in a way that’s realistic for a home kitchen.
👉 Simple Farmhouse Sourdough Bread Recipe
And if your last loaf didn’t turn out the way you hoped, you’re not behind.
You’re learning.
That’s exactly how every good baker starts.
You also don’t have to do this alone. As I mentioned earlier, beginning with a seasoned dehydrated starter can remove much of the early frustration. It allows you to focus on fermentation and technique without wondering whether your starter is strong enough.
You can always experiment with creating your own from scratch later, once you’ve built confidence and baked a few beautiful loaves.
The tried-and-true starter I use in my own kitchen can be found here:
And when you pull that first beautifully risen, golden loaf from your oven — the crackle of the crust and the smell filling your kitchen — you’ll understand why it was worth the effort.
Frequently Asked Questions
Why is my sourdough flat?
A flat sourdough loaf is usually caused by under-fermentation, over-fermentation, or weak starter strength.
Why is my sourdough gummy inside?
Gummy sourdough often comes from under-baking, under-fermentation, or cutting too soon.
Why is my sourdough dense?
Dense crumb is commonly caused by under-fermentation or insufficient starter activity.
Continue Your Sourdough Journey
👉Simple Farmhouse Sourdough Bread Recipe (Beginner-Friendly + Digestible)
Learn the full beginner-friendly process for mixing, fermenting, shaping, and baking sourdough bread.
👉How to Fix Sticky Sourdough (7 Secrets for Soft, Airy Bread)
If you’ve struggled with sticky dough or flat loaves, I’m going to walk you through exactly how to fix it.
👉My Exact Sourdough Baking Schedule (How I Make It Work In My Home Bakery)
See how I manage fermentation, shaping, and baking when making dozens of loaves each week.
2 responses to “Beginner Sourdough Mistakes: Why Your Loaf Is Flat, Dense, or Gummy (And How to Fix It)”
-
I’m sure struggling! Equally as hopeful that I can learn how to “correct” and step into “beautiful sourdough land”
I’ve worked bakeries for much of my teen/college years, have a strong traditional baking rep, but sourdough eludes me. I once dreamed of owning/running a sourdough bakery, but right now I struggle for one good loaf 😫-
I’m sorry to hear that. I’m sure your going to “get it”. I have faith. Couple questions for you… How old is your starter? Is it from scratch or did you get it from a friend or dehydrated starter? The reason I ask is because from my experience, 90% or more of the time its a starter issue, ranging from not feeding or using at the right time or just not strong enough. If you start from scratch it can actually take months to get a good loaf of bread. Many instructions say you can bake in a week or so, in my opinion that’s not realistic. Stater gets its bacteria from the environment and ingredients. If you already bake sourdough in your home and have a lot of wild yeast present it may be very quick, but most people don’t have that. So…try not to get discouraged it can take time. Your starter may even look healthy and rise and fall like its suppose to but not be able to make good bread because it doesn’t have enough of the right bacteria and yeast present. Also, I know most people want to start from scratch but I highly recommend starting with a dehydrated starter. You will be baking beautiful loaves in a week! You can always go back and start one from scratch after you get the techniques down. I do sell my starter here https://bewellforlifestore.com/product/organic-sourdough-starter/ and have amazing feedback from it. Feel free to reach out to me directly on email or social media if you have any questions 😉. Best of luck!
-
Tags:

Leave a Comment