Sub-Total: $0.00
The Wonder Bread of Sourdough: My Go-To Soft Sandwich Loaf

 (1)")
If you’ve been looking for a soft sourdough sandwich loaf that’s fluffy, versatile, and perfect for everyday sandwiches, this recipe is for you.
This is my go-to soft sandwich loaf—the one I reach for when I want dependable, versatile, family-friendly bread. It’s also one of the best sellers in my microbakery, and for good reason. It has all the flavor of sourdough with a soft crust and light, airy crumb that feels a little nostalgic.
Around here, I call it the Wonder Bread of sourdough because it has that classic soft sandwich bread texture, but with the depth of flavor only sourdough can bring.
It’s perfect for sandwiches, toast, grilled cheese, French toast, and just about anything else you’d use sandwich bread for.
But one of my favorite things about this dough is how versatile it is.
This same dough can be used for:
- Hamburger buns
- Hot dog buns
- Dinner rolls
- Slider buns
- Sandwich rolls
If you’re looking for one soft sourdough dough to keep in your back pocket, this is a great one.
Mixing the Dough
To start, mix together your active sourdough starter, sugar, water, and olive oil until everything is combined. This helps evenly distribute the starter and gives the dough a smoother start.
Don’t worry about the sugar—this bread does not turn out sweet. The sugar plays an important role in feeding the yeast during fermentation and helps create the soft, fluffy texture that makes this loaf so special.
Next, add in your flour and salt and mix until a shaggy dough forms. At this stage, don’t worry about making it smooth. It will look rough and uneven, and that’s exactly what you want.
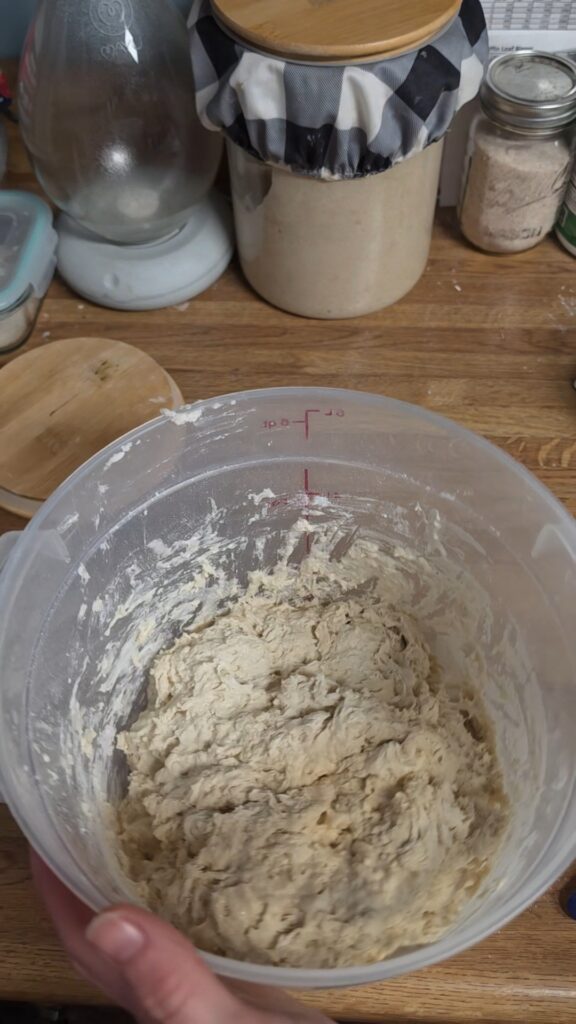
Cover the bowl and let it rest for 30 minutes. This short rest allows the flour to fully hydrate and gives gluten development a head start.
Stretch and Folds
After the initial rest, perform 3 sets of stretch and folds spaced 30 minutes apart.
This step helps strengthen the dough without intensive kneading. You’ll notice the dough becoming smoother and stronger with each round.
Remember, these stretch and folds are included in your total bulk fermentation time.
Bulk Fermentation
After your stretch and folds are complete, cover the dough and let it continue bulk fermenting until it has at least doubled in size. For me, this usually takes about 7 hours total from the time I first mix the dough.
Timing can vary depending on your starter strength and room temperature, so always watch the dough more than the clock.
You’re looking for:
- noticeable rise
- bubbles throughout
- a soft, airy feel
- a domed surface
Pre-Shaping
Once bulk fermentation is complete, turn the dough out onto your work surface and loosely shape it into a round ball.
Let it rest uncovered for about 15 minutes. This bench rest gives the gluten time to relax, making final shaping much easier.
If you’re making buns or rolls, skip this step. Instead, leave the dough in the bowl after bulk fermentation and transfer it straight to the refrigerator for the overnight cold proof. You’ll divide and shape the dough the next day before the final rise.
Final Shaping
For a Sandwich Loaf
After the 15-minute bench rest, shape your dough into your loaf. I use the same shaping technique for my sandwich loaves that I use for my traditional sourdough loaves, and the video below shows that method.
The main difference is that for a sandwich loaf, you’ll place the dough seam side down in the pan since you won’t be flipping it out of a banneton basket before baking 😉.
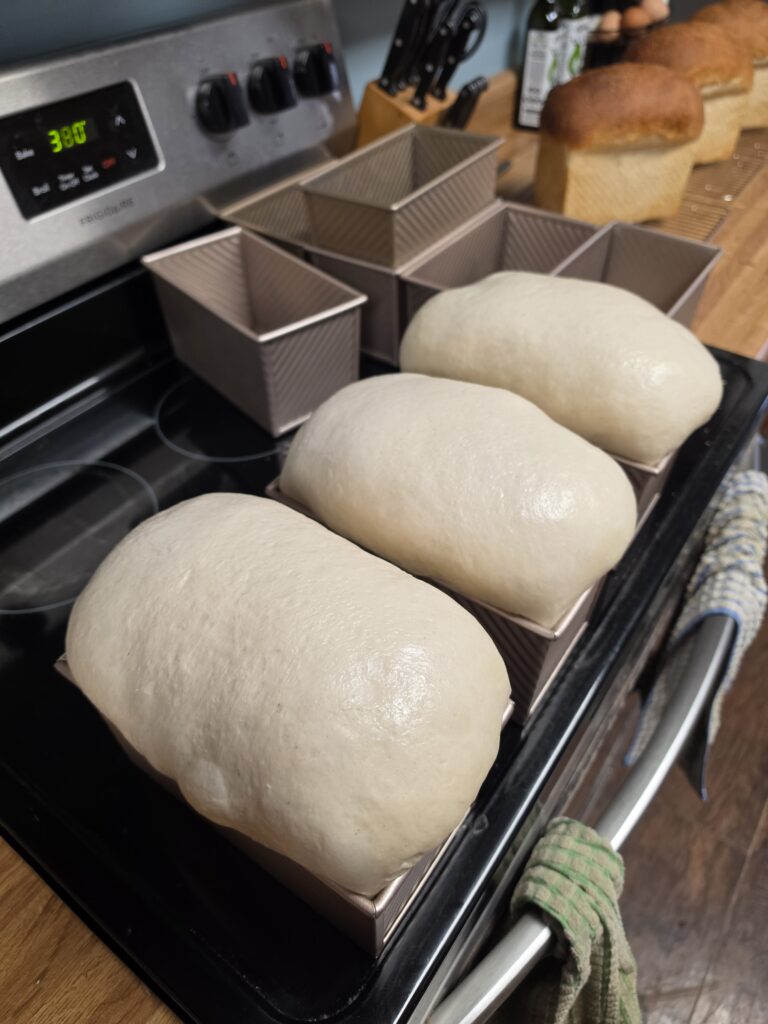
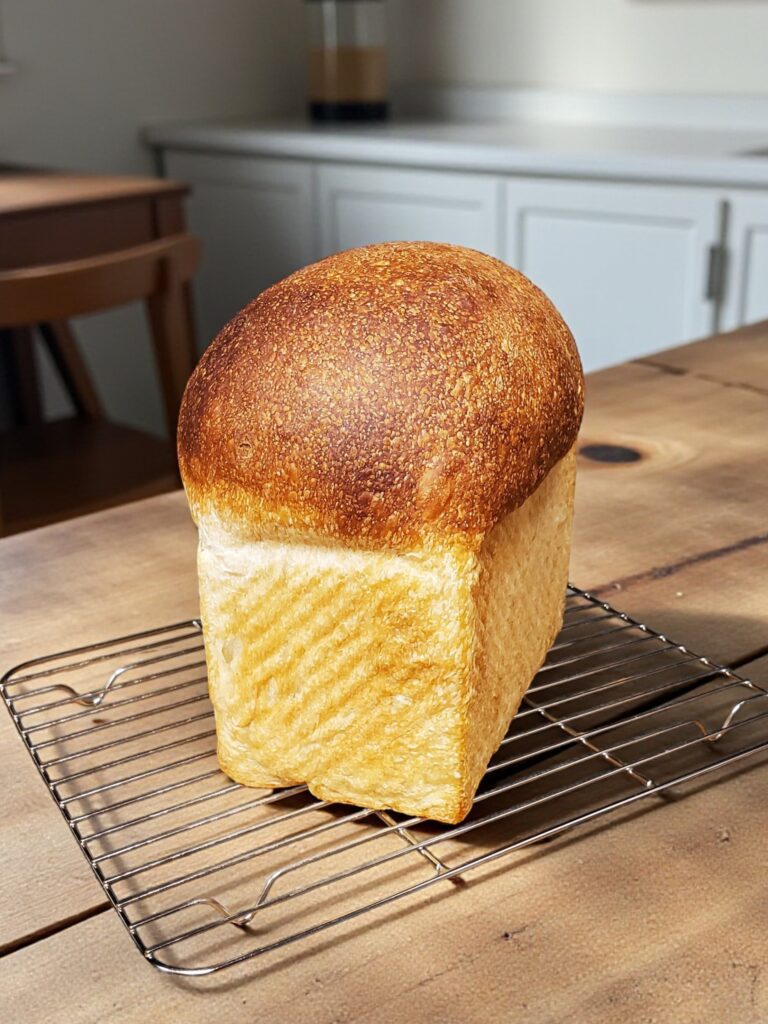
This recipe makes one large loaf (about 942g total dough weight), which is ideal for a tall Pullman pan. If you’re using standard loaf pans, you can divide the dough into two smaller loaves at about 471g each.
If you’re looking for a loaf pan like the one I use, I’ve linked a few of my favorite options below. The tall Pullman-style pan below is the exact one I use and works especially well for getting that high sandwich loaf shape.
Place your shaped loaf into the pan and cover it so the dough doesn’t dry out. I like to use disposable shower caps for this, but a tea towel or cloth works just fine too.
Let it rest at room temperature for 1 to 1½ hours before transferring it to the refrigerator for the overnight cold proof.
At this point, your total room temperature fermentation time will be around 8½ hours.
For Buns or Rolls
If making buns or rolls, there is no shaping at this stage. After bulk fermentation, leave the dough covered in the bowl and transfer it straight to the refrigerator for the overnight cold proof.
You’ll divide, shape, and do the final rise the next day on baking day.
Cold Proof Overnight
The cold proof is where this recipe becomes really flexible and easy to work into your schedule.
For sandwich loaves: after shaping and the 1 to 1½ hour room temperature rest, transfer your loaf pan to the refrigerator for the overnight cold proof.
For buns or rolls: after bulk fermentation, do not pre-shape or turn the dough out onto your work surface. Leave the dough right in the mixing bowl, cover it, and transfer it straight to the refrigerator for the overnight cold proof. You will divide and shape your buns or rolls the next day.
This overnight rest helps develop flavor, improves dough handling, and makes baking much more convenient.
Baking Day
The next day, remove your dough from the refrigerator.
For Sandwich Loaves
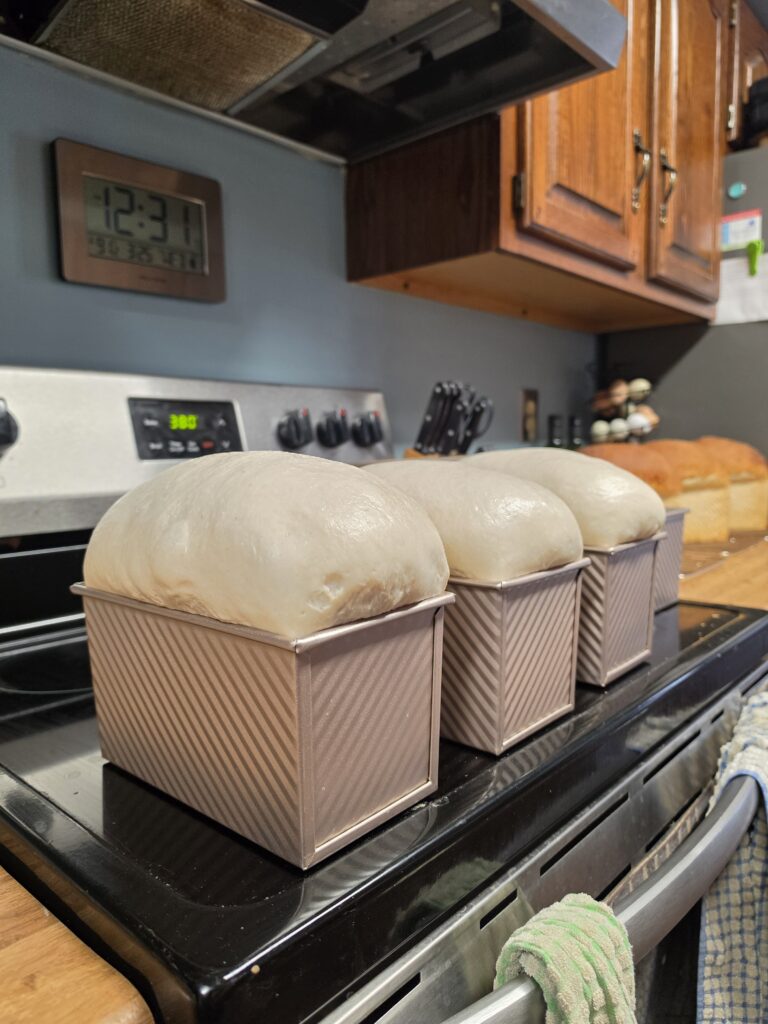
If baking a loaf, leave it covered in the pan and allow it to finish rising at room temperature.
Depending on how much it rose overnight, this usually takes anywhere from 2 to 4 hours.
You want the dough to feel light, airy/jiggly, and puffy before baking. It should rise significantly above the edge of the pan.
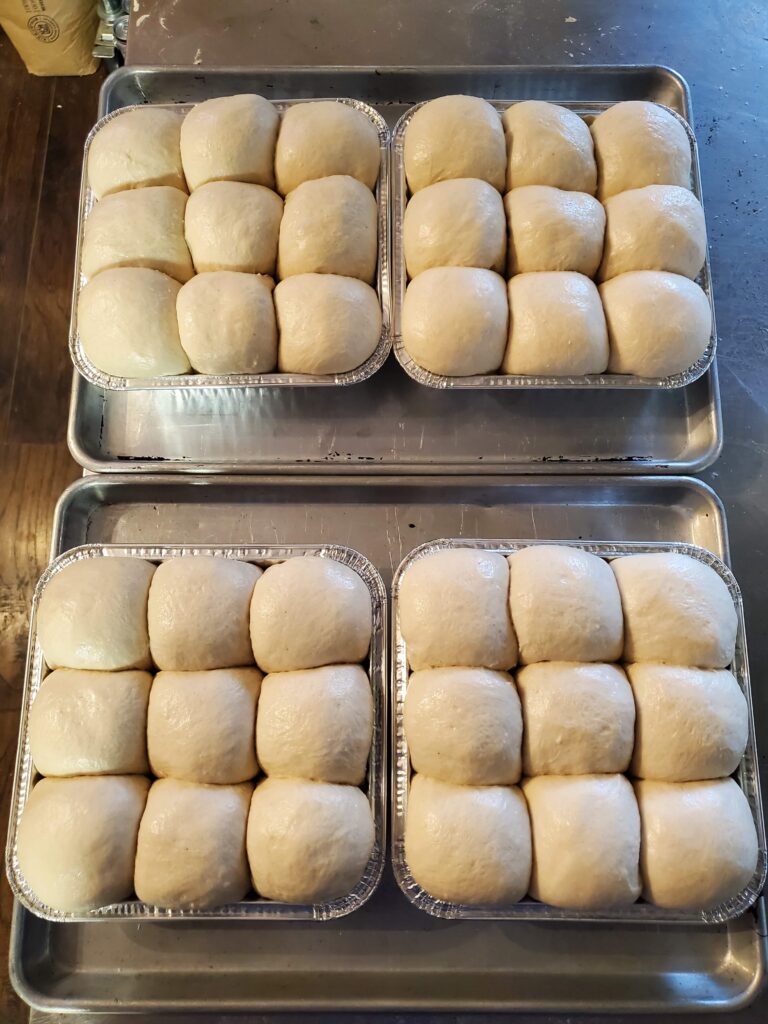
For Hamburger Buns or Dinner Rolls
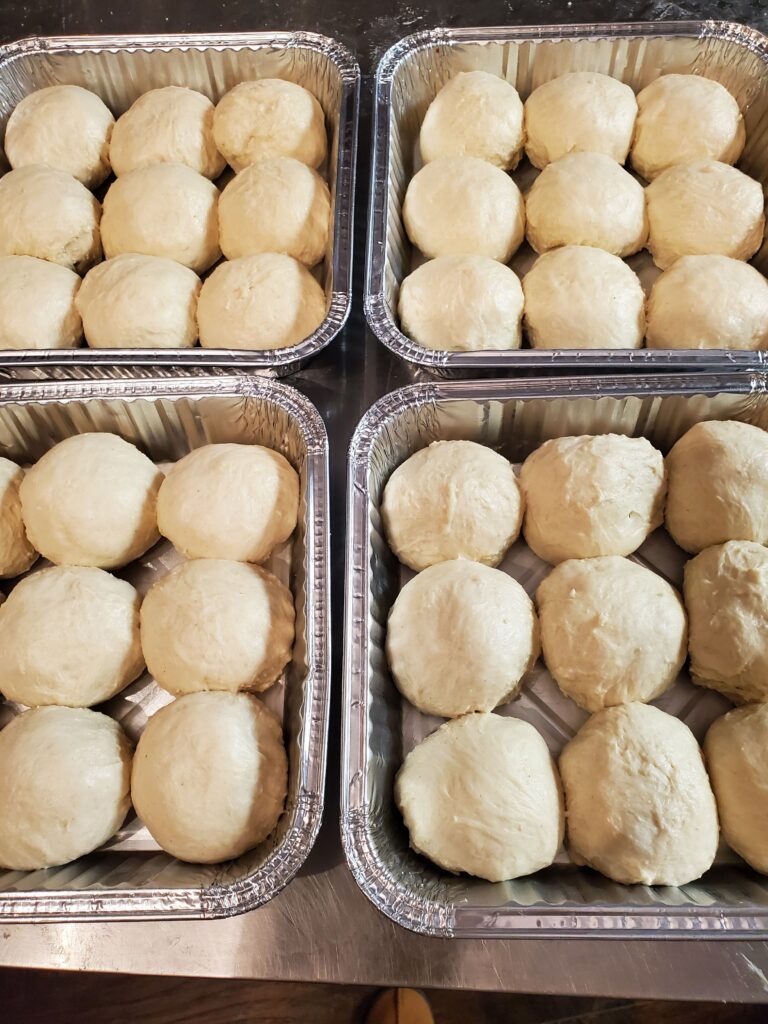
If making buns or rolls, remove the cold dough from the bowl and divide it into your desired portions:
- 8 equal portions for hamburger or hot dog buns (about 118g each)
- 9 equal portions for dinner rolls (about 105g each)
Shape your dough and place onto your baking tray or into your prepared 9×9 pan.
Cover lightly with a damp cloth and let rise for 3 to 5 hours, or until soft, puffy, and airy.
Baking
Bake at 375°F.
For Sandwich Loaves
Bake for about 40 minutes:
- 20 minutes
- Rotate 180°
- Another 20 minutes
If your oven bakes evenly, you may not need to rotate.
For Hamburger Buns
Buns usually bake a little quicker.
Bake for:
- 18 minutes
- Rotate 180°
- Another 18 minutes
Keep a close eye on them toward the end, as they can brown quickly.
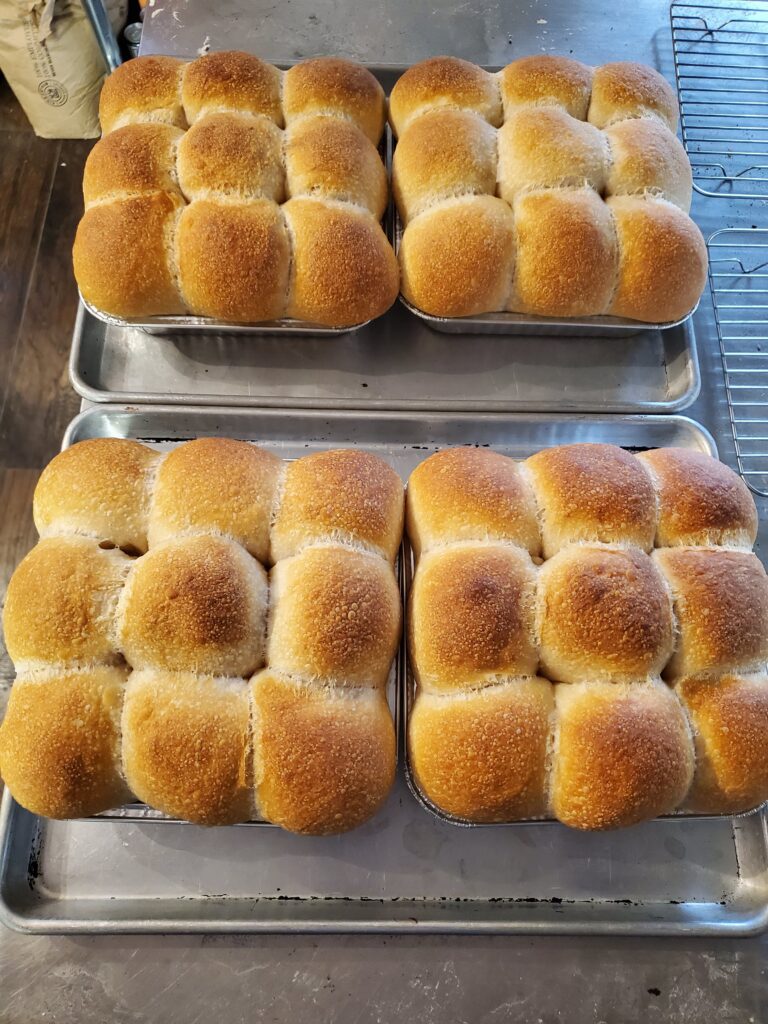
For Dinner Rolls
Dinner rolls are usually best with the full 40 minutes since they are packed closely together in the pan.
Still, check them a few minutes before the full bake time, as every oven bakes differently.
Baking Notes:
If you’d like deeper browning on any variation, add an extra 1–3 minutes at the end.
If using a tall Pullman loaf pan, lower your oven rack to the second position from the bottom to give the loaf enough room to rise.
Cooling
Once baked, remove the loaf, buns, or rolls from the pan immediately.
This is important because steam will continue collecting in the pan and can make the crust wet or soggy if left too long.
Transfer it to a cooling rack and let it cool completely before slicing.
I know it’s tempting—but letting it cool fully gives you the best texture.
Final Thoughts
This loaf has become one of my favorite staples because it checks every box: soft, fluffy, flavorful, and versatile.
Whether you use it for sandwiches, toast, buns, or rolls, it’s one of those recipes that quickly earns a permanent spot in your kitchen.
If you make it, I’d love to hear how it turns out—drop a comment below! 😉
Continue Your Sourdough Journey
👉My Go-To Micro Bakery Tools (What I Actually Use Daily)
These are the essentials that keep everything moving—from mixing dough to baking bread to getting orders out the door.
👉How to Fix Sticky Sourdough (7 Secrets for Soft, Airy Bread)
These are the exact methods I use to get dough that is strong, airy, and easy to handle—whether I’m making a couple loaves or 60+ loaves a week.
If you try this recipe, I’d love for you to leave a rating below ⭐⭐⭐⭐⭐— it helps others and supports my small bakery.
Soft Sourdough Sandwich Loaf
Great versatile dough for bread, buns, rolls, etc…
Equipment
- 1 Clear Container or mixing bowl
- 1 Loaf Pan
Ingredients
- 65 grams active Sourdough starter
- 56 grams sugar
- 20 grams olive oil
- 300 grams water
- 500 grams bread flour
- 9 grams salt
Instructions
- Mix the doughIn a large bowl/container, mix together your active starter, sugar, water, and olive oil until combined.Add the flour and salt, mixing until a shaggy dough forms.
- RestCover the bowl and let the dough rest for 30 minutes.
- Strengthen the doughPerform 3 sets of stretch and folds, spaced 30 minutes apart.These stretch and folds are included in your total bulk fermentation time.
- Bulk fermentLet the dough bulk ferment for about 7 hours total from the time you first mixed the dough, or until it has at least doubled in size.
- Pre-shape and restTurn the dough out onto your work surface and loosely shape it into a round ball. Let it rest uncovered for 15 minutes.This short bench rest allows the gluten to relax, making final shaping easier.
- ShapeShape into your preferred loaf.This recipe makes one large loaf (about 942g total dough weight), ideal for a tall Pullman pan.If using standard loaf pans, divide into two loaves at about 471g each.*See notes if you are making buns or rolls.
- RestCover and let the shaped dough rest at room temperature for 1–1.5 hours.At this point, your total room temperature fermentation time will be around 8½ hours.
- Overnight cold proofTransfer to the refrigerator and cold proof overnight.Bake the next day whenever it fits your schedule.
- Second RiseRemove from the fridge and let rise again for 2–4 hours, depending on how much it rose overnight.Look for a puffy, airy/jiggly dough before baking.
- BakePreheat oven and bake at 375°F.If using a tall Pullman pan, lower your oven rack to the second position from the bottom.Bake for:-20 minutes-Rotate 180°-Bake another 20 minutesTotal bake time: 40 minutesIf you want deeper browning, add 1–3 extra minutes.*See notes for baking time adjustments for buns and rolls.
- CoolingRemove the loaf from the pan right away after baking.Leaving it in the pan traps steam and can make the crust soggy.Transfer to a cooling rack and let cool completely before slicing.Enjoy!
Notes
- This loaf freezes beautifully.
- Great for sandwiches, toast, and French toast.
- The sugar and oil help create that soft “classic sandwich bread” texture.
- Best sliced after fully cooled.
- This dough is highly versatile and can be used for more than just sandwich bread.
- Try shaping it into hamburger buns, hot dog buns, dinner rolls, slider buns, or sandwich rolls.
- 8 hamburger or hot dog buns
- 9 dinner rolls in a 9×9 pan
- Sandwich loaves bake for about 40 minutes.
- Hamburger and hot dog buns usually bake faster, around 36 minutes total (18 minutes, rotate, then another 18 minutes). Watch closely toward the end, as they brown quickly.
- Dinner rolls typically need the full 40 minutes because they are baked close together in the pan, but check a few minutes early.
10 responses to “The Wonder Bread of Sourdough: My Go-To Soft Sandwich Loaf”
-
Sounds perfect, if making buns would you use any egg wash?
-
You could if you want to. I don’t find it necessary but it’s optional 😉.
-
-
No salt measurment in the recipe.
-
Ah! Thank you for catching theat. It’s fixed now 9g of salt. Sorry about that…I’m going to have to fire my editor…me…lol.
-
-
I’m in England, what sugar do you use please?
-
I use organic cane sugar. Here’s the exact one I use 😉 Cane Sugar
-
-

Thank you for always sharing your recipes which is easy to follow. I am making progress and motivated to try different recipes whenever I have the time!💕🌹-
You’re welcome! I’m glad you are enjoying them 😊.
-
-
I followed the steps exactly, but one loaf of bread got a crack while baking. I want to send you a picture 😥
-
Dang…It totally happens sometimes. Every once in a while I have one that turns out weird with a bubble or crack. At least the weird ones still taste the same 😉. If you want to send me a picture you can email me info@bewellforlifestore.com
-
Tags:

Leave a Comment